Table of Contents
ToggleDyson makes some of the most powerful cordless vacuums on the market, but they didn’t always nail the storage side of things. Early models came with flimsy wall brackets or nothing at all, leaving homeowners to prop expensive machines in closets or against walls. A dedicated vacuum stand solves this problem by keeping the unit upright, charged, and ready to go, without drilling into studs or cluttering floor space. Whether someone’s dealing with a V8, V11, V15, or one of the newer Gen5 models, the right stand transforms a loose cleaning tool into an organized station. This guide walks through stand types, selection criteria, DIY build options, and installation strategies to help anyone create a functional home for their Dyson.
Key Takeaways
- A Dyson vacuum stand prevents tip-overs and damage while keeping attachments organized and centralized in one accessible location.
- Wall-mounted stands offer maximum space efficiency but require stud installation, whereas freestanding stands provide flexibility and work well for renters without wall penetrations.
- When selecting a Dyson vacuum stand, verify model compatibility, check weight capacity (15+ pounds with attachments), and assess accessory storage needs based on your attachment collection.
- DIY freestanding stands made from wood cost $15-25 and can be customized to match room aesthetics while providing the same functionality as retail options.
- Proper placement near outlets, away from foot traffic, and with cable management using adhesive clips ensures safe charging and prevents trip hazards in mudrooms or laundry rooms.
- Freestanding bases should be positioned on level flooring with rubber feet for stability, while wall mounts must align with studs and use a level for proper installation.
Why You Need a Dedicated Stand for Your Dyson Vacuum
Dyson’s stick vacuums don’t come with built-in kickstands, and leaning them against furniture risks tip-overs that can crack plastic housings or damage the bin release mechanism. A stand keeps the unit stable and prevents accidental damage.
Beyond protection, a stand centralizes accessories. Most Dysons ship with three to six attachments, crevice tools, brush heads, extension wands, that end up scattered in junk drawers or lost behind appliances. A good stand incorporates slots or hooks for these pieces, cutting down on the time spent hunting for the right nozzle mid-clean.
Charging logistics also improve. Wall-mounted docking stations work well if the vacuum lives near an outlet, but renters or those with limited wall access need freestanding options that route the charging cable cleanly without creating trip hazards. A stand with integrated cable management keeps cords tidy and maintains a full charge without permanent installation.
Finally, vertical storage saves square footage. Closet floors are premium real estate in most homes. A stand that holds the vacuum upright reclaims that space for bins, shoes, or other gear, especially in utility closets, laundry rooms, or mudrooms where every inch counts.
Types of Dyson Vacuum Stands: Finding the Perfect Fit
Dyson vacuum stands fall into two main categories: wall-mounted and freestanding. Each has trade-offs in stability, installation effort, and adaptability to different home layouts.
Wall-Mounted Stands
Wall-mounted stands attach directly to studs or drywall anchors and hold the vacuum off the floor. They’re the most space-efficient option and work well in closets, garages, or laundry rooms with open wall space.
Most designs use two to four screws driven into studs for maximum holding strength. Studs are typically spaced 16 inches on center in residential framing, so locating them with a stud finder is step one. For drywall-only installations, toggle bolts or heavy-duty anchors rated for 50+ pounds prevent sagging over time, especially with heavier models like the V15 or Outsize.
Some wall mounts include integrated charging docks that replicate Dyson’s OEM wall bracket but add accessory storage. These usually feature molded slots for two to four attachments and a shelf for the charger. Installation requires routing the power cable to a nearby outlet, which may mean fishing wire through walls or using adhesive cable clips along baseboards.
Renters or those who don’t want to patch screw holes should skip wall mounts. Damage deposits and lease terms often prohibit wall penetrations, making freestanding stands the safer bet.
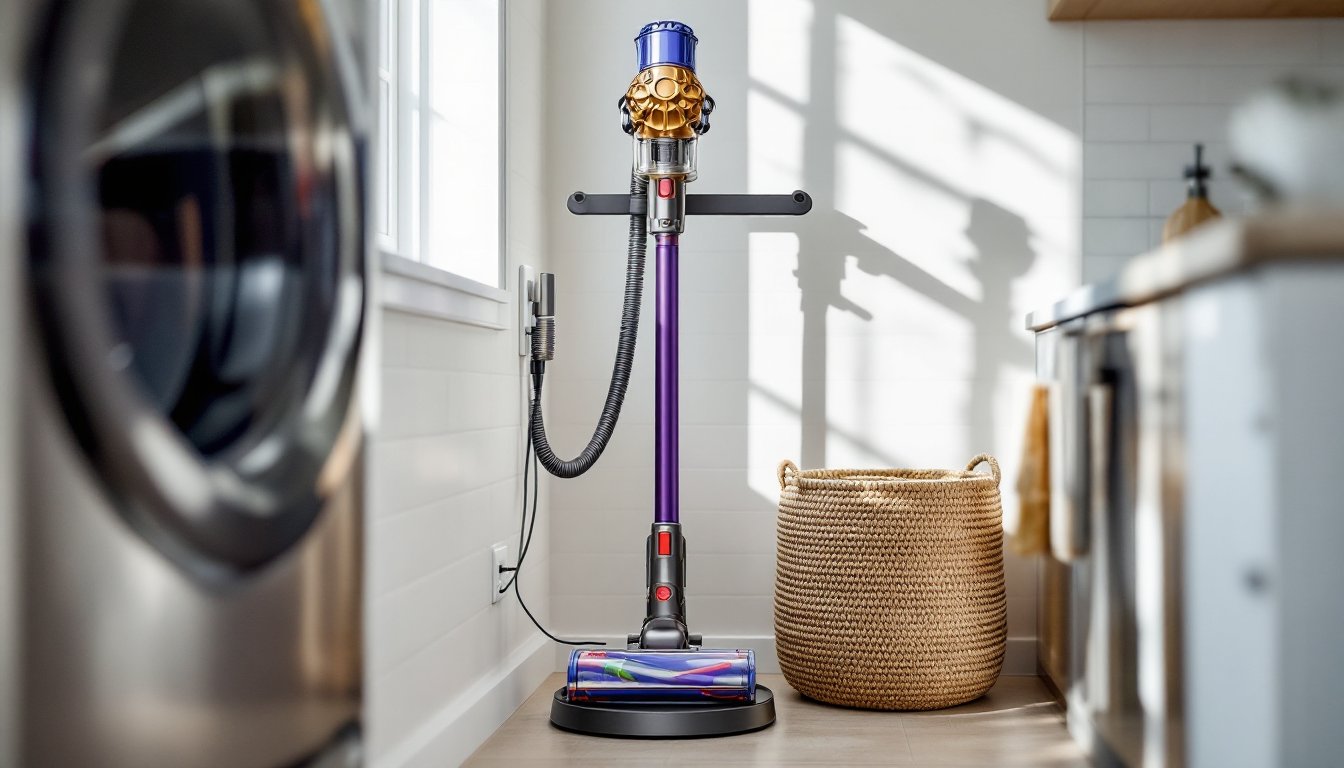
Freestanding Floor Stands
Freestanding stands rest on the floor without fasteners and rely on a weighted base or wide footprint for stability. They’re ideal for renters, people with plaster or tile walls, or anyone who rearranges furniture frequently.
Most freestanding models use a T-shaped or tripod base with rubber feet to prevent sliding on tile, hardwood, or laminate. Base diameters range from 12 to 18 inches, with wider footprints offering better tip resistance. A stand with a narrow base may topple if someone bumps it while pulling the vacuum free, so checking stability specs matters.
Accessory storage varies. Budget stands offer simple hooks or pegs, while premium versions include rotating carousels, magnetic attachments, or tiered shelves. Some designs accommodate multiple Dyson models, which helps if the household upgrades vacuums but wants to reuse the stand.
Portability is a bonus. Freestanding stands move between rooms or homes without tools, making them useful for seasonal cleaners who store the vacuum in a garage during winter but bring it into the house during pollen season. They also work in basements with concrete floors where drilling is a hassle.
How to Choose the Right Dyson Vacuum Stand for Your Home
Model compatibility comes first. Dyson’s V-series vacuums share similar dimensions, but the Outsize, Ball, and older DC models have different footprints and attachment types. Most aftermarket stands list compatible models in the product description, verify the vacuum’s model number before buying.
Weight capacity matters for heavier units. The V15 Detect weighs around 6.8 pounds, while the Outsize pushes 8 pounds. Add a motorized floor head (another 2-3 pounds) and the stand needs to support at least 15 pounds without wobbling. Check manufacturer specs or user reviews for real-world stability feedback.
Accessory count drives storage needs. Someone with a basic V8 and two attachments doesn’t need a stand with eight slots, but a V15 owner with the full toolkit, laser detect head, hair screw tool, combination tool, crevice nozzle, soft dusting brush, and extension hose, benefits from multi-tier storage that keeps everything visible.
Material quality affects longevity. Cheap plastic stands crack under UV exposure or repeated vacuum removal. Look for powder-coated steel, aluminum alloy, or high-density ABS plastic rated for indoor use. Outdoor garage storage demands rust-resistant finishes.
Cable management features reduce clutter. Stands with built-in cord wraps, clips, or channels prevent tangled charging cables and keep the area looking tidy. Some include pass-through slots that hide the cable inside the stand’s column.
Finally, consider the installation surface. Carpet, tile, hardwood, and concrete each interact differently with freestanding bases. Rubber feet work on hard surfaces, but carpet may require a stand with spiked feet or a rigid platform underneath to prevent sinking. When planning home maintenance checklists, ensuring proper vacuum storage should rank alongside seasonal HVAC and gutter cleaning tasks.
DIY Dyson Vacuum Stand: Build Your Own Custom Storage Solution
Building a custom stand lets someone match exact storage needs, room aesthetics, and available materials. A basic freestanding model requires minimal tools and costs less than most retail options.
Materials list:
- One 2×4 stud (8 feet long, actual dimensions 1.5″ × 3.5″)
- One 3/4-inch plywood round or square base (16-18 inches diameter)
- Four 3-inch wood screws (for base attachment)
- Wood glue
- Sandpaper (120-grit)
- Polyurethane or paint (optional finish)
- Four rubber furniture pads (adhesive-backed)
Tools needed:
- Circular saw or miter saw
- Drill with countersink bit
- Measuring tape
- Pencil
- Safety goggles and hearing protection
Cut the 2×4 to 48 inches for the vertical post. This height works for most Dyson stick vacuums, keeping the handle off the floor and the motorhead elevated. Sand all edges smooth to prevent splinters.
Cut the plywood base to a 16-inch diameter circle or square. A jigsaw works for curves: a circular saw handles straight cuts. Drill a pilot hole in the center of the base, then position the 2×4 upright and drive screws through the base into the post’s end grain. Add wood glue for extra strength. Countersink screw heads so they sit flush.
For accessory storage, drill 1-inch diameter holes at varying heights along the post’s face. Space them 4 inches apart vertically to prevent crowding. Insert short dowels or PVC pipe segments (cut to 3-4 inches) into the holes, gluing them in place. These act as pegs for hanging nozzles and brushes.
Finish the wood with polyurethane for moisture resistance, or paint it to match the room’s color scheme. Let it cure for 24 hours before use. Attach rubber pads to the base’s underside to protect floors and add grip.
This design accommodates any Dyson stick model and costs around $15-25 depending on lumber prices. It’s also modular, add magnetic strips along the post for metal attachments, or screw in hooks for extension wands.
Installation Tips and Best Placement Strategies
For wall-mounted stands, always anchor into studs when possible. Use a stud finder to locate framing, mark the centerline with a pencil, then position the bracket so screw holes align. If studs don’t line up with the bracket’s mounting pattern, use a single stud and supplement the opposite side with a toggle bolt rated for the vacuum’s weight.
Drill pilot holes slightly smaller than the screw diameter to prevent wood splitting. A 3/16-inch bit works for most wood screws in stud framing. Drive screws with a drill on low torque to avoid stripping threads, finishing the last few turns by hand for precision.
Check the mount’s level before fully tightening. A vacuum that leans forward can slide out of the cradle, while a backward tilt stresses the mounting screws. Use a 4-foot level for accuracy, adjusting shims if needed.
Placement should prioritize accessibility and outlet proximity. Mudrooms and laundry rooms are popular choices, they’re near high-traffic areas where quick cleanups happen, and outlets are usually plentiful. Avoid damp basements or unheated garages: lithium-ion batteries degrade faster in extreme temperatures.
Keep the stand at least 6 inches from corners or door swings to allow easy vacuum removal without bumping walls. If mounting in a closet, ensure the door clears the vacuum’s height when closed. Measure twice, most Dyson sticks are 48-50 inches tall when upright.
For freestanding stands, position them on level flooring away from foot traffic lanes. A stand in the middle of a walkway becomes a tripping hazard. Tuck it beside a utility sink, in a pantry corner, or next to a coat rack where it’s visible but out of the main path.
If charging the vacuum on the stand, route the cable along baseboards using adhesive cable clips spaced every 12 inches. Avoid running cords across doorways or under rugs, which creates fire and trip risks. Use a surge protector if plugging multiple devices into the same outlet.
Consider lighting. Dark closets make it hard to grab the right attachment. A battery-powered LED puck light mounted above the stand improves visibility without wiring. Some newer cordless vacuums, like those reviewed in Dyson’s V15 lineup, feature built-in battery indicators, but ambient lighting still helps when sorting through accessories.
Finally, test the setup. Pull the vacuum off the stand a few times to confirm it releases smoothly. Adjust peg heights or hook positions if attachments rub against each other or fall off during removal. A well-tuned stand should feel intuitive, grab, clean, return, without fumbling.